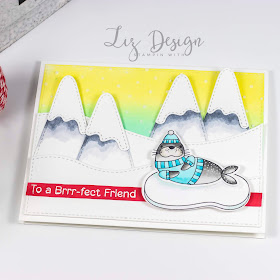
I picked the cute seal from the set to be the vocal point for this card. He even has a little sweater and hat on, just the sweetest! I coloured this fun guy with Copic Markers. Check the photo below to see which colours I used.
I started colouring with my darkest marker in the same color scheme on the places where I'd like the most shade to be and then start colouring my way up to the lightest colour. After finishing my colouring with the Copic Markers, I added some dots with a white gel marker. I placed my image with dimensionals on to my finished card at the end to make it stand out a bit more.
I used a base from white cardstock for my card and started building the scenery up. I used a Stitched Rectangle Die from MFT for the background and started blending this piece of cardstock with a blending tool and Squeezed Lemonade and Cracked Pistachio Distress ink from Ranger. I diecutted a piece of cardstock with the Snowfall Vertical Die from MFT to use as a stencil to add the snowflakes with white embossing paste.
I then added the mountains, diecutted with the Snow-capped Mountains Dies and coloured with Copics. I placed them behind the snow front that I diecutted with the Stitched Snoe Drifts Dies from MFT as well. I added white embossed tekst on a piece of white cardstock that I coloured with a red Copic marker. Check the Video Tutorial to see how this all came about below, or watch in HD on YouTube here!
I would love to enter this card at the new sketch challenge over at the MFT Challenge. Thank you so much for watching today, hope to see you next time!


Super leuke kaart, Linda!
BeantwoordenVerwijderenDank je weer Jeanet!
Verwijderen