vrijdag 30 november 2018

Stampin with Liz Design: Precious Delivery Card with Video Tutorial!

Hoi, welkom vandaag bij een nieuwe blog post van Stampin with Liz Design! Leuk dat je mijn blog (weer) hebt gevonden! Vandaag laat ik jullie graag ter inspiratie een schattig kaartje zien, gemaakt met de stempelset Precious Delivery van Stampin' Up!

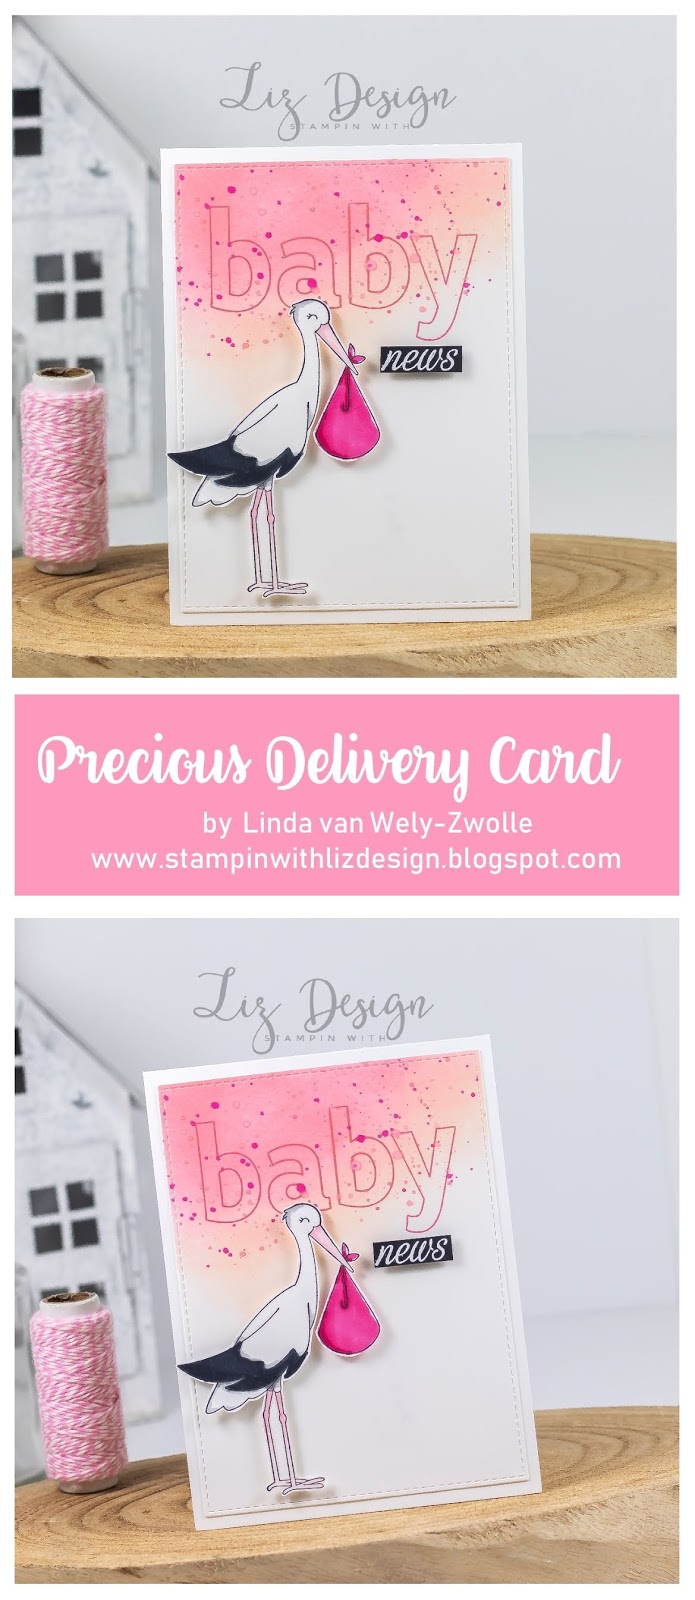
Hi, welcome today at a new blog post from Stampin with Liz Design! Nice of you to stumble by my blog (again)! Today I'd like to share a sweet card with you for inspiration, created with the stamp set Precious Delivery from Stampin' Up!


Ik houd wel van een leuke baby kaart. Nu hopen natuurlijk dat ik deze kaart binnenkort op mag sturen naar iemand, een baby in de familie- of vriendenkring zou wel weer heel erg leuk zijn natuurlijk! Mijn kaart ligt al klaar, haha. Ik ben begonnen met de ooievaar voor deze kaart. Ik heb deze gestempeld met Black Tuxedo Memento inkt met de Stamparatus, een geweldige stempel tool waarmee je meerdere keren kunt stempelen om een prachtig, rijke afbeelding te stempelen. Daarna heb ik de ooievaar uitgeknipt. 

I love a sweet baby card, now I'm hoping I'm going to send this card out soon to someone, wouldn't a little baby be nice? Well, my card is ready, lol! I started this card with the vocal point, the stork. I stamped this gorgeous fellow with Memento Tuxedo Ink using the Stamparatus, an amazing stamping tool. To get a rich stamped image, you best stamp at least twice, which a stamping tool let's you do with ease! I then fussy cutted the stork. 


Daarna ben ik begonnen met een achtergrond te blenden. Ik heb hiervoor twee kleuren inkt gebruikt, Petal Pink en Flirty Flamingo inkt. Ik heb vervolgens het Whisper White Cardstock gestanst met een stitched rectangle die (deze is afkomstig van MFT). Daarna heb ik de tekst baby gestempeld met Flirty Flamingo inkt. Dit gave letters komen uit de Lined Alphabet stempelset.

I then started blending a background in two colours. I used Petal Pink and Flirty Flamingo ink. I then diecutted the Whisper White cardstock with a stitched rectangle die (this one comes from MFT). I then stamped the text baby on to my background. These cool letters are from the Lined Alphabet stamp set.


Ik heb een aantal sputters aangebracht in twee kleuren, Flirty Flamingo en Lovely Lipstick om mijn kaart iets meer uitstraling te geven. Ik heb de tekst 'new' gestempeld met Versamark inkt op Basic Black Cardstock en bestrooid met wit embossingpoeder. Daarna heb ik deze verhit met een heat tool en uitgeknipt. Wil jij zien hoe deze kaart tot stand is gekomen, check dan onderstaande Video Tutorial of bekijk deze in HD op YouTube! Volg mij op YouTube om op de hoogte te blijven van nieuwe projecten, ik probeer een paar keer per week te posten.


I added some spatters in two colours, Flirty Flamingo and Lovely Lipstick. Just to give my card a bit more flair. I stamped the text 'news' with Versamark ink on Basic Black cardstock, sprinkled it with white embossing powder and heat setted it with a heat tool. I then fussycutted the text. Would you like to see how I created this card? Check my Video Tutorial below or watch in HD on YouTube! I'd love it if you would follow me on YouTube, I try posting a few times a week.


Bedankt voor je bezoekje, tot de volgende keer!

Thanks for visiting, see you next time!


https://www.facebook.com/StampinwithLizDesign/?ref=bookmarkshttps://www.youtube.com/channel/UC94CUqin1kXfhno_CpAZB_g?view_as=subscriber

Product List
Versamark Pad
[102283]
€ 11,00
Pink Pirouette Stampin' Blends Markers Combo Pack
[144604]
€ 11,00
Stamparatus
[148187]
€ 59,00
Stampin' Trimmer
[129722]
€ 36,00

woensdag 28 november 2018

Stampin with Liz Design: Animal Outing Card!

Welkom vandaag bij weer een nieuwe blogpost van Stampin with Liz Design! Gisteren heb ik een leuke tip gedeeld bij Stampin' Up! en vandaag wil ik deze tip natuurlijk ook graag met mijn bloglezers delen. Mijn favoriete techniek is een achtergrond blenden. Ik heb veel vragen van jullie ontvangen over hoe je dit doet en vandaag deel ik graag  wat tips met jullie!

Welcome today at a new Stampin with Liz Design blog post! Yesterday I shared a fun technique over at Stampin' Up! and today I'd like to share this tip with you as well on my blog. My favourite technique is blending a background and some of you asked me how to do this, so here some tips!


Ik ben vandaag gegaan voor een kaart voor een kaart met safari look met de schattige diertjes uit de Animal Outing stempelset. Ik heb deze diertjes op Whisper White Cardstock gestempeld met Tuxedo Black Memento ink and gestanst met de bijpassende Animal Friends thinlits. Daarna heb ik ze gekleurd met Stampin' Blend Markers. Je kunt de gebruikte kleuren en items onderaan deze post in een supply list vinden.

I went for a safari look for my card using the fun animals from the Animal Outing Stamp set. I stamped these cuties on Whisper White Cardstock with Tuxedo Black Memento ink and then diecutted them with the coordinating Animal Friends Thinlits. I coloured them with the Stampin' Blends Markers. You can check all the colours and items used for this card at the and of my post in a Supply List.


Ik heb voor de basis van deze kaart een strook Whisper White cardstock genomen. Voor de bodem ook. Beide delen heb ik gesponst met een Stamping Sponge en inkt. Voor de lucht heb ik Daffodil Delight en Pumpkin Pie inkt gebruikt. Voor de bodem Crumb Cake inkt. Om te bgeinnen met sponsen, dip je de spons op je inktpad. Ik knip mijn spons in vier stukjes en beïnkt de ronde kant. Begin met sponsen op een stuk papier dat je niet gaat gebruiken. Veeg met draaiende bewegingen over je papier. De tip is wel om de eerste inkt op een stuk extra papier kwijt te raken, zoals je kunt zien op de foto hierboven aan de linkerkant van mijn papier is de eerste inkt te hard, te rijk op het papier. Breng meerdere lagen aan totdat je tevreden bent met het resultaat. Een beetje oefening is nodig, maar wanneer je de techniek door hebt, is het eigenlijk heel makkelijk en een leuke techniek! Om wat meer structuur aan te brengen, kun je nog kiezen om spatters aan te brengen, dit kan zowel in dezelfde kleur of een andere kleur inkt of door wat waterdruppels op je papier te laten vallen. Voor de bodem heb ik beide gedaan.

For the base of my card I used a piece of Whisper White Cardstock. I used a different piece of this paper for the bottom of my card. I sponged both pieces with ink and a Stamping Sponge For the sky I used Daffodil Delight and Pumpkin Pie inks. For the bottom I used Crumb Cake ink. To create this effect, simply dip your sponge in your ink pad. (I cut my sponges in four pieces and inked the round part.) Begin sponging in an area that will not be used for your card and start applying ink in round movements. Important note: The trick for a nicely blended result is first to dab some ink OFF your sponge. As you can see in the photo on the left, the area where I first applied Pumpkin Pie ink looks too harsh because I started with too much ink. To get a great, even result, apply more then one layer untill you are satisfied with the end result! It takes a bit of practise, but when you get the hang of this technique, it is a lot of fun and actually very easy to do! To give a bit more texture to your sponged paper, you can spatter some ink in the same or a different color . . . or let some waterdrops fall on your paper. I applied both tips on the “sand” part of my card.


Neem het deel wat het mooist gesponst is en trim deze op maat voor je kaart. Ik houd zelf erg van de stitched look en heb mijn kaart een stitched randje gegeven met een framelit uit de Stitched Labels Framelits. De bodem heb ik gemaakt met een framelit die je vind in de Swirly Scribbles Thinlits. De tekst is bovenaan mijn kaart gestempeld met Tuxedo Black Memento inkt. De giraf en het nijlpaard zijn achter het papier geplaatst voor de bodem, de kangaroo en de tak met kikker zijn met dimensionals op de kaart aangebracht.

Take the best part of your sponged pieces of paper and trim it to the size of your card. I love the stitched look and gave my card a stitch on the edges with the stitched die from the Stitched Labels Framelits. I created the bottom by die cutting two pieces of sponged paper with the die you’ll find in the Swirly Scribbles Thinlits. I stamped the sentiment in Tuxedo Black Memento Ink at the top of my card. I placed the giraffe and rhino behind my paper. The kangaroo and branch with the frog are adhered on the card using Stampin’ Dimensionals.

Bedankt voor je bezoekje, tot de volgende keer!
Thanks for visiting, see you next time!


https://www.facebook.com/StampinwithLizDesign/?ref=bookmarkshttps://www.youtube.com/channel/UC94CUqin1kXfhno_CpAZB_g?view_as=subscriber
Product List
Stampin' Trimmer
[129722]
€ 36,00
Big Shot
[143263]
€ 120,00